以下使用 pnpm 作為套件管理工具,與 npm 或 yarn 的指令會有些許差異,請查看隨附的官方文件
TL;DR
完整配置範例:https://github.com/ngseke/vite-vue-ts-eslint-example
🏗️ 透過 Vite 官方的 Preset 新建專案
pnpm create vite my-vue-app --template vue-ts
pnpm create vite my-vue-app --template vue-ts
移動到該目錄並安裝相依
cd my-vue-app
pnpm i
cd my-vue-app
pnpm i
🏗️ 初始化 ESLint
pnpm create @eslint/config
pnpm create @eslint/config
依序回答以下問題後,便會在根目錄新建 .eslintrc.cjs:
✔ How would you like to use ESLint? · style
✔ What type of modules does your project use? · esm
✔ Which framework does your project use? · vue
✔ Does your project use TypeScript? · No / Yes
✔ Where does your code run? · browser
✔ How would you like to define a style for your project? · guide
✔ Which style guide do you want to follow? · standard-with-typescript
✔ What format do you want your config file to be in? · JavaScript
✔ Would you like to install them now? · No / Yes
✔ Which package manager do you want to use? · pnpm
😵 處理 VSCode Output 的 ESLint 的問題
雖然 ESLint 已初始化完成,但你會發現它尚未正常運作。例如試著在任意 .ts 或 .vue 檔隨便加多餘的空格,卻看不到預期的 error 或 warning 的波浪底線。
查看 Output 會看到以下錯誤訊息:
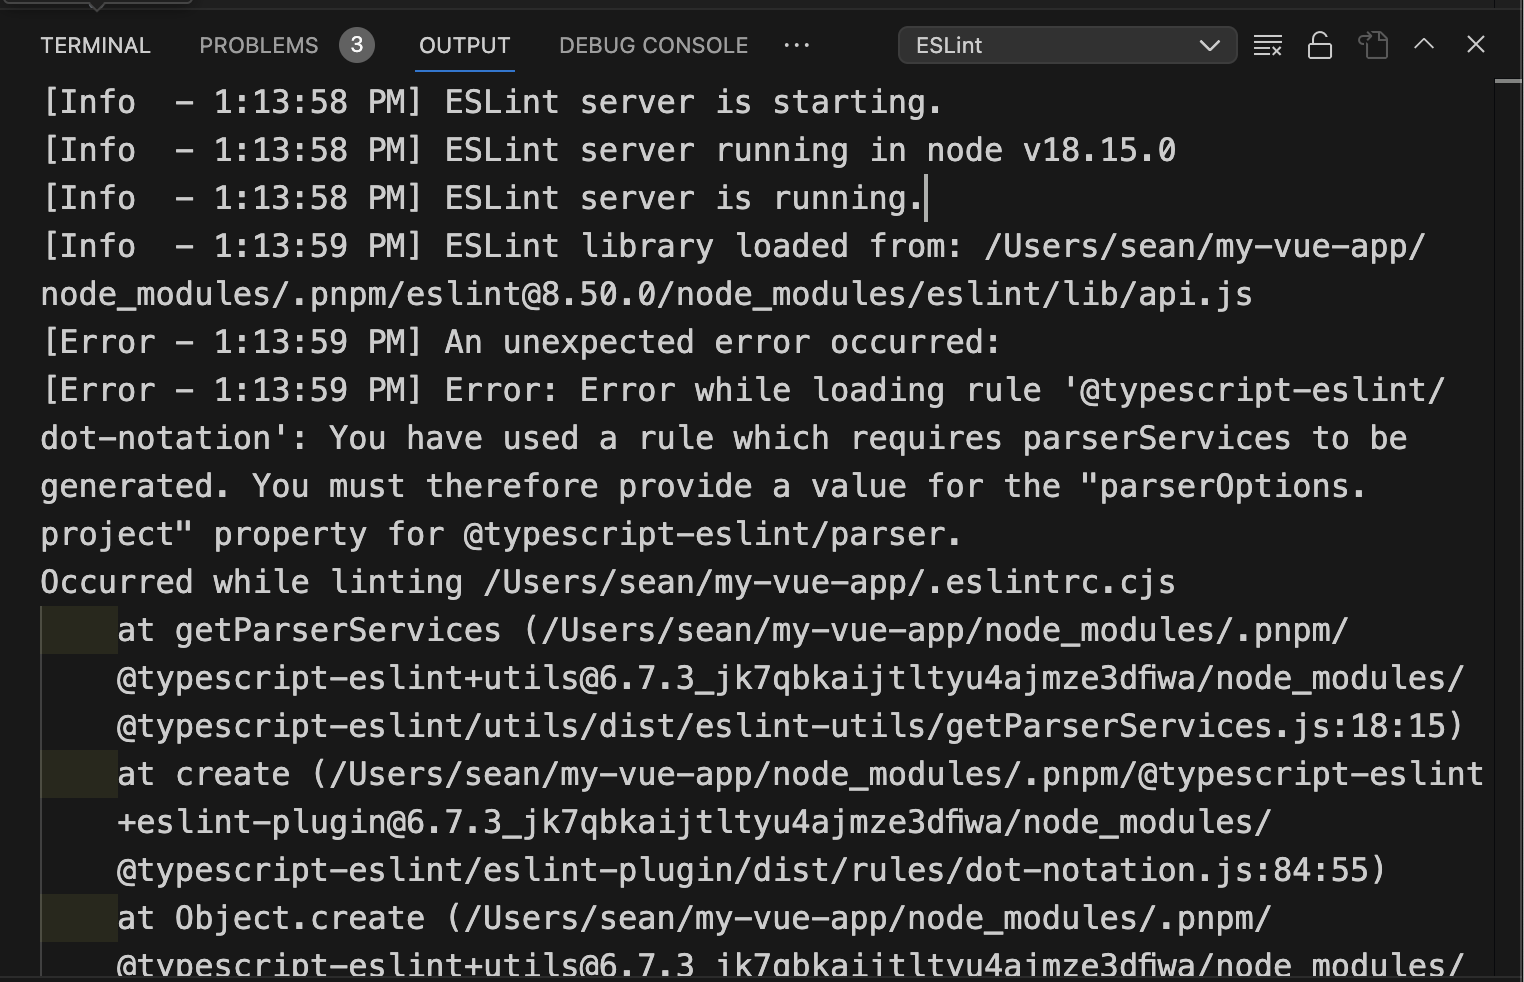
An unexpected error occurred:
Error: Error while loading rule ‘@typescript-eslint/dot-notation’: You have used a rule which requires parserServices to be generated. You must therefore provide a value for the “parserOptions.project” property for @typescript-eslint/parser.
根據錯誤訊息的描述,得知需要在 .eslintrc.cjs 補上 parserOptions.project 並指明 parserOptions.parser。
// .eslintrc.cjs
module.exports = {
    // ...
    "parserOptions": {
        "ecmaVersion": "latest",
        "sourceType": "module",
+       project: ['./tsconfig.json', './tsconfig.node.json'],
+       parser: '@typescript-eslint/parser',
    },
}
// .eslintrc.cjs
module.exports = {
    // ...
    "parserOptions": {
        "ecmaVersion": "latest",
        "sourceType": "module",
+       project: ['./tsconfig.json', './tsconfig.node.json'],
+       parser: '@typescript-eslint/parser',
    },
}
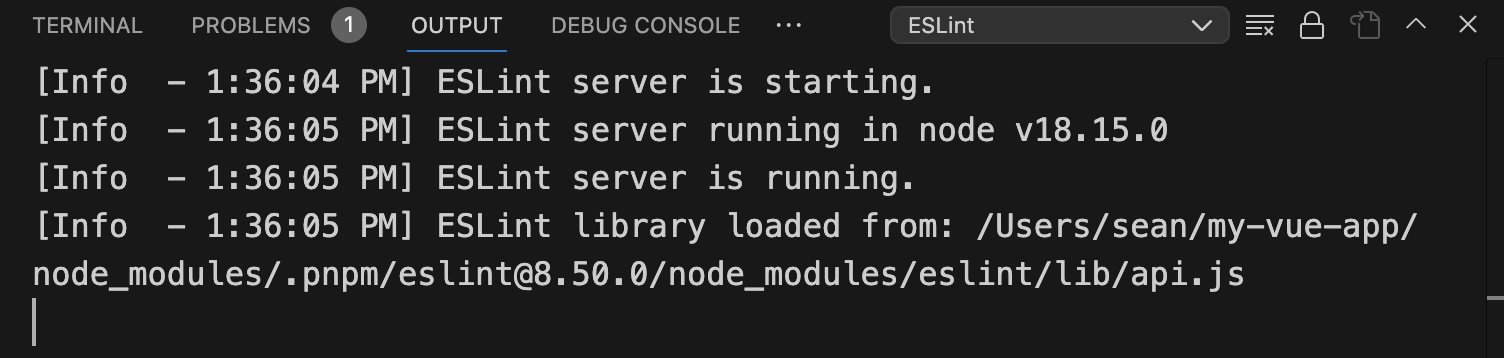
再次查看 Output 錯誤訊息已消失
Q: 為什麼是
parserOptions.parser而非parser?
A: 根據官方文件說明,若寫在parser會把vue-eslint-parser覆蓋掉而無法正常地 lint.vue檔。所以當有自訂的 parser 時(例如@typescript-eslint/parser),必須把它移入parserOptions。
😵 處理根目錄檔 TSConfig include 的問題
雖然 Output 錯誤訊息已消失,但這時用 VSCode 開啟在根目錄的 .ts 和 .cjs 檔,例如 vite.config.ts 和.eslintrc.cjs,會發現它們在開頭都多了紅色的波浪底線:
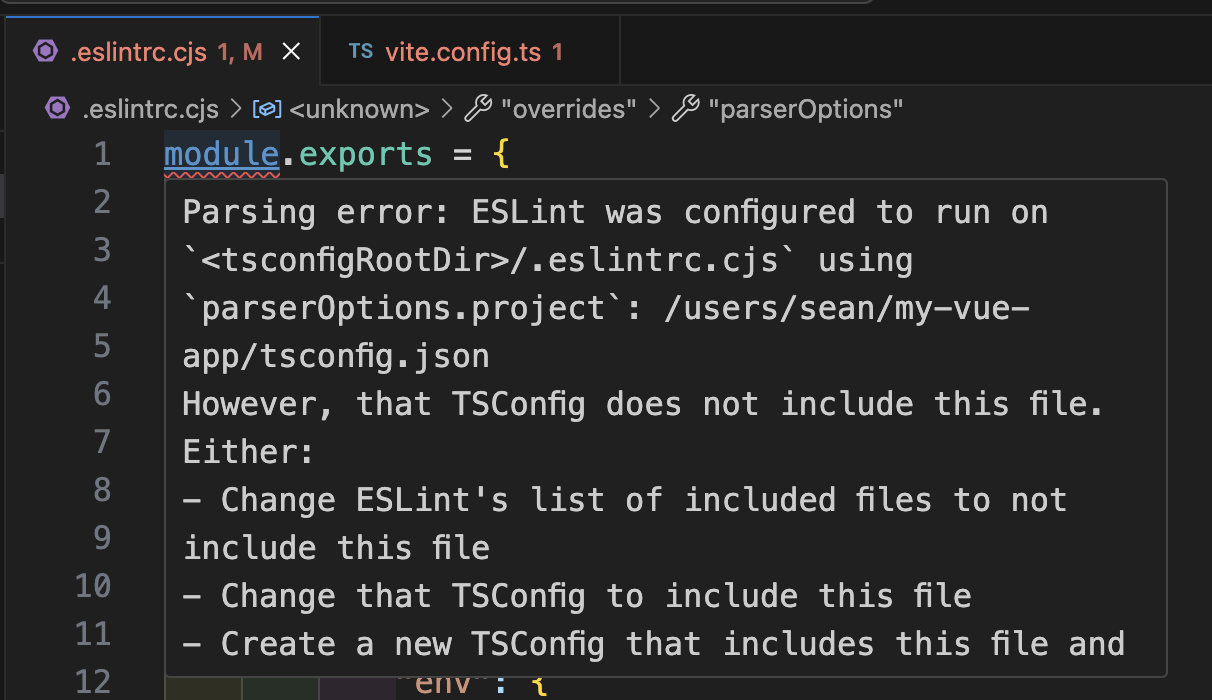
Parsing error: ESLint was configured to run on
<tsconfigRootDir>/.eslintrc.cjsusingparserOptions.project: /users/sean/my-vue-app/tsconfig.json
However, that TSConfig does not include this file. Either:
- Change ESLint’s list of included files to not include this file
- Change that TSConfig to include this file
- Create a new TSConfig that includes this file and include it in your parserOptions.project
See the typescript-eslint docs for more info: https://typescript-eslint.io/linting/troubleshooting#i-get-errors-telling-me-eslint-was-configured-to-run--however-that-tsconfig-does-not--none-of-those-tsconfigs-include-this-filee
根據錯誤訊息得知,我們必須在 tsconfig.node.json 的 includes 中手動加入這些檔案:
// tsconfig.node.json
{
  // ...
  "include": [
    "vite.config.ts",
+   ".eslintrc.cjs"
  ],
}
// tsconfig.node.json
{
  // ...
  "include": [
    "vite.config.ts",
+   ".eslintrc.cjs"
  ],
}
日後若是在根目錄有新增那些在 Node 環境執行的,而不會被實際打包進專案的設定檔,例如 Tailwind CSS 的設定檔
tailwind.config.ts,也要記得手動加入進去。
接著重新載入 VSCode 視窗
叫出指令視窗
⌘ + shift + P→ 輸入Developer: Reload Window

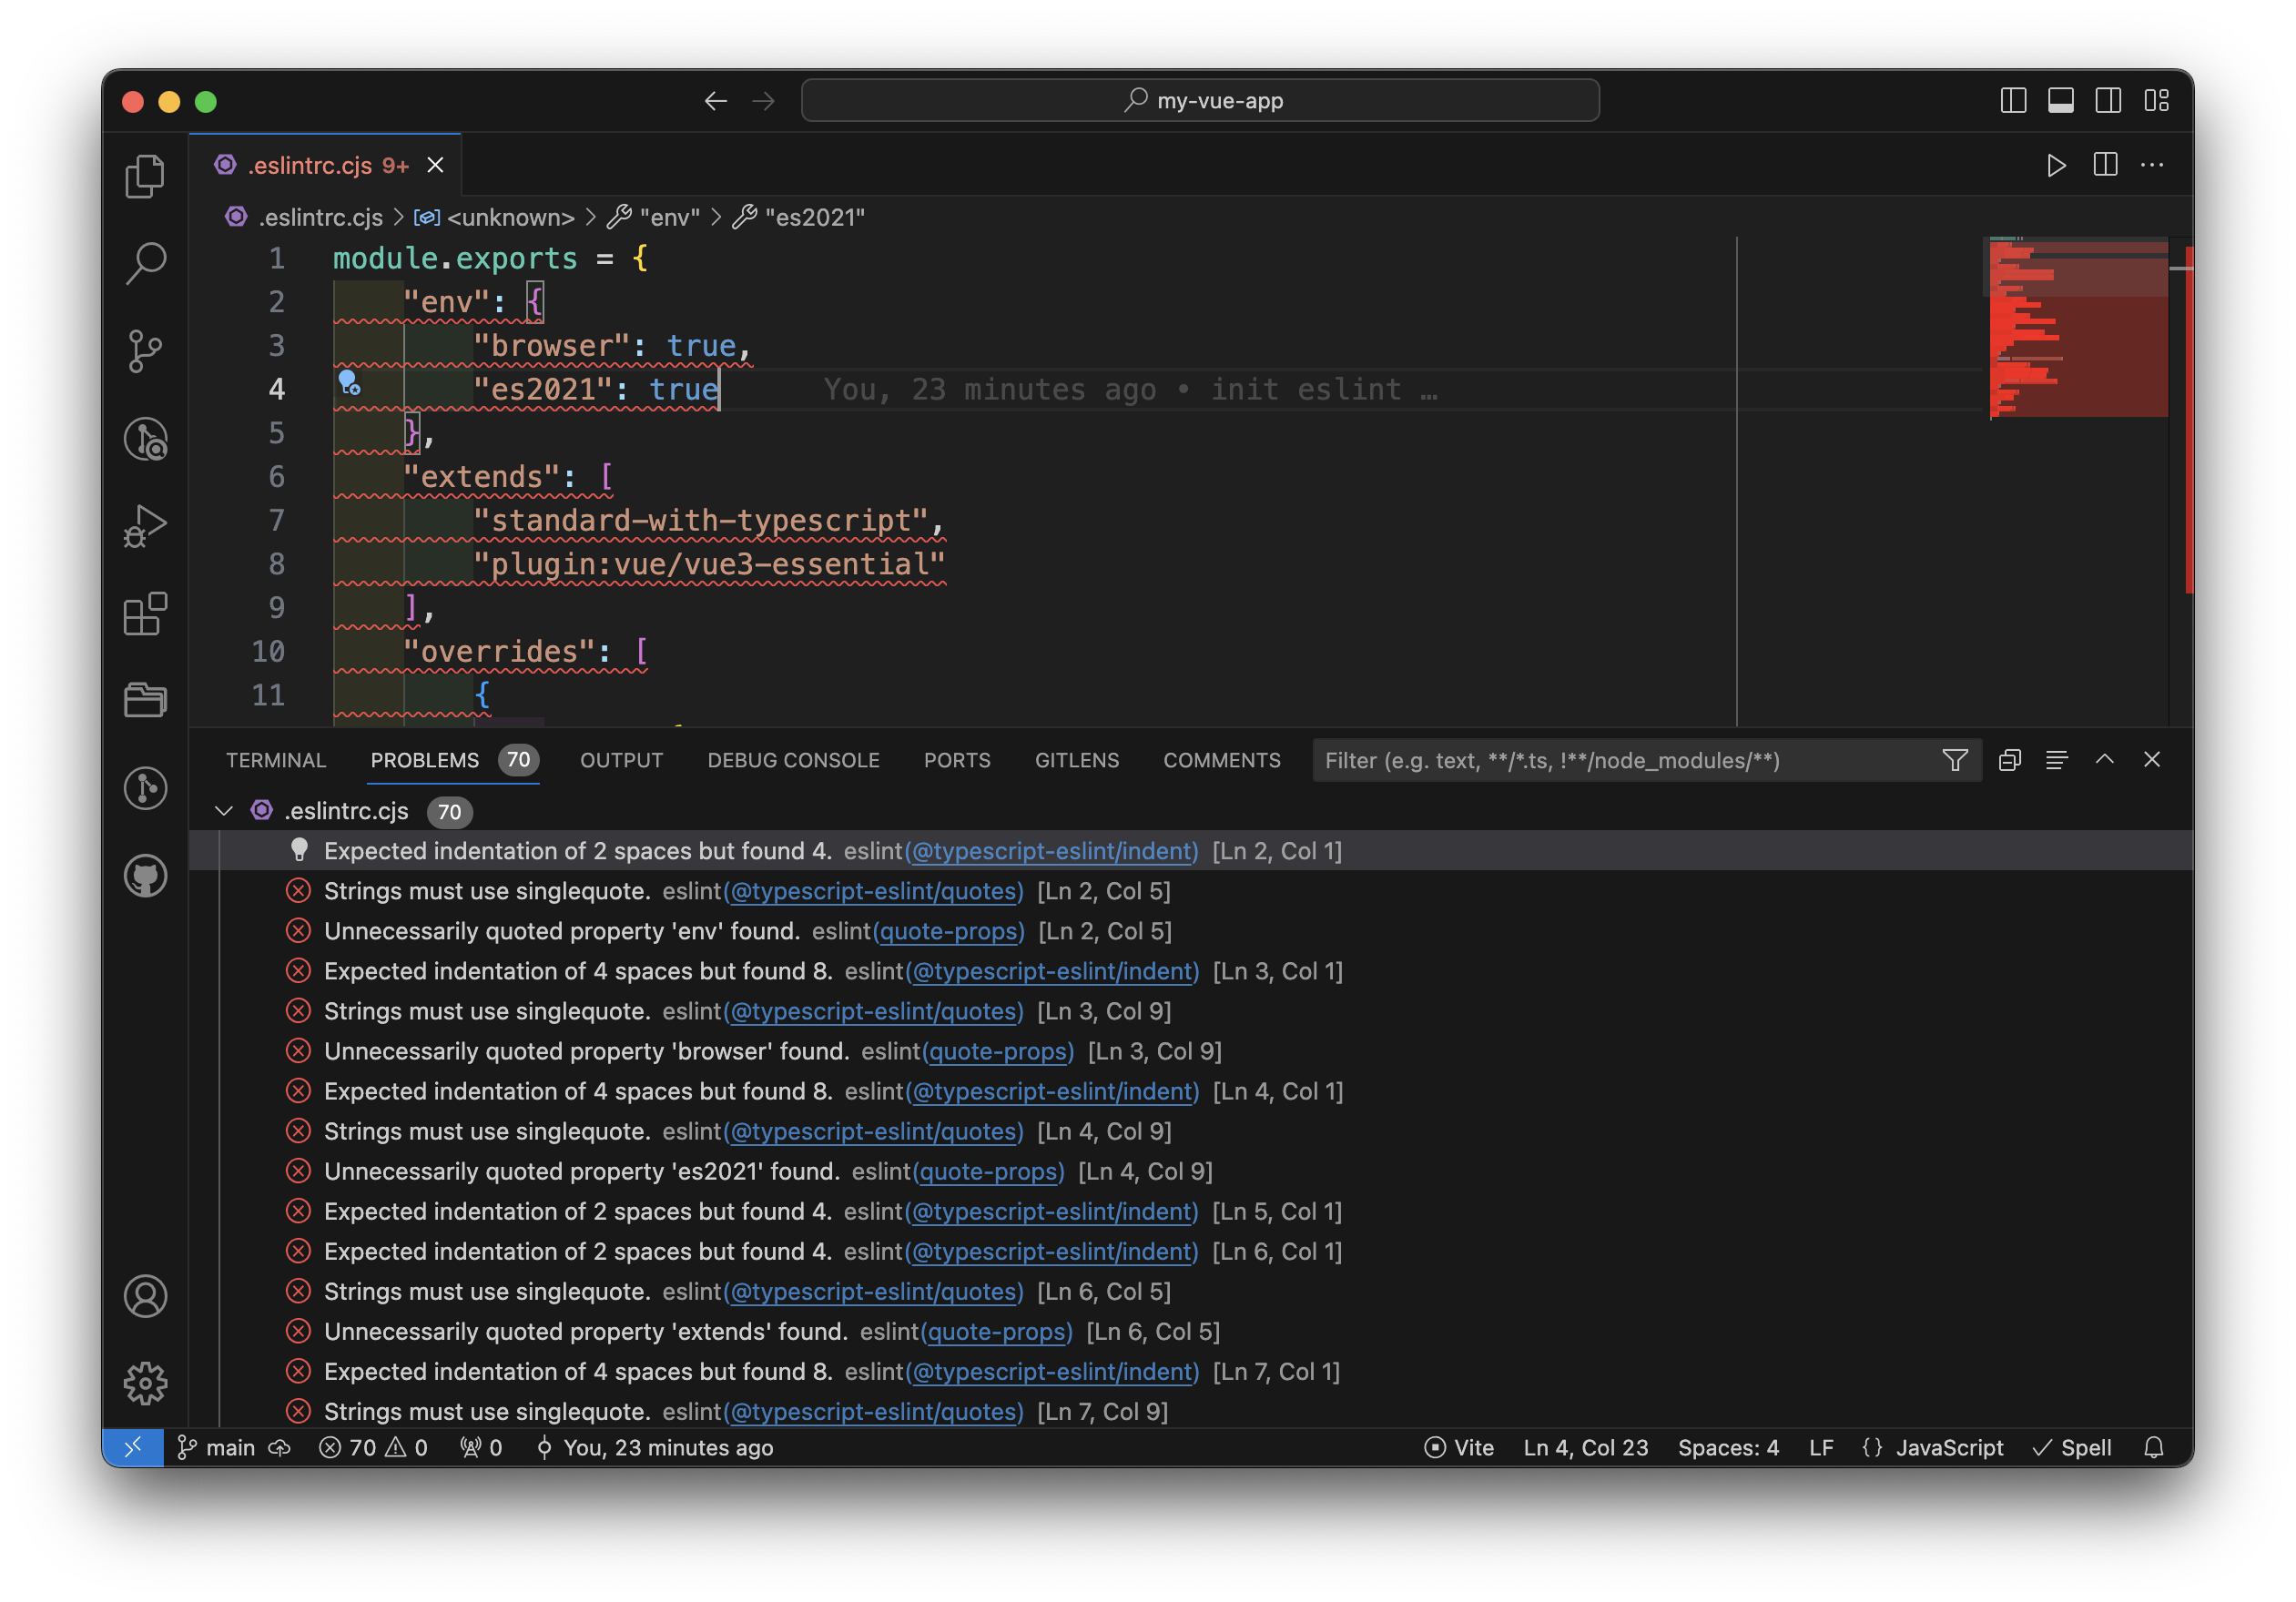
打開 .eslintrc.cjs 可以看到 ESLint 終於正常運作了,它開始確實根據 eslint-config-standard-with-typescript 的預設規則進行檢查,例如多餘的引號、字串應為單引號和縮排應為 2 格空格等。
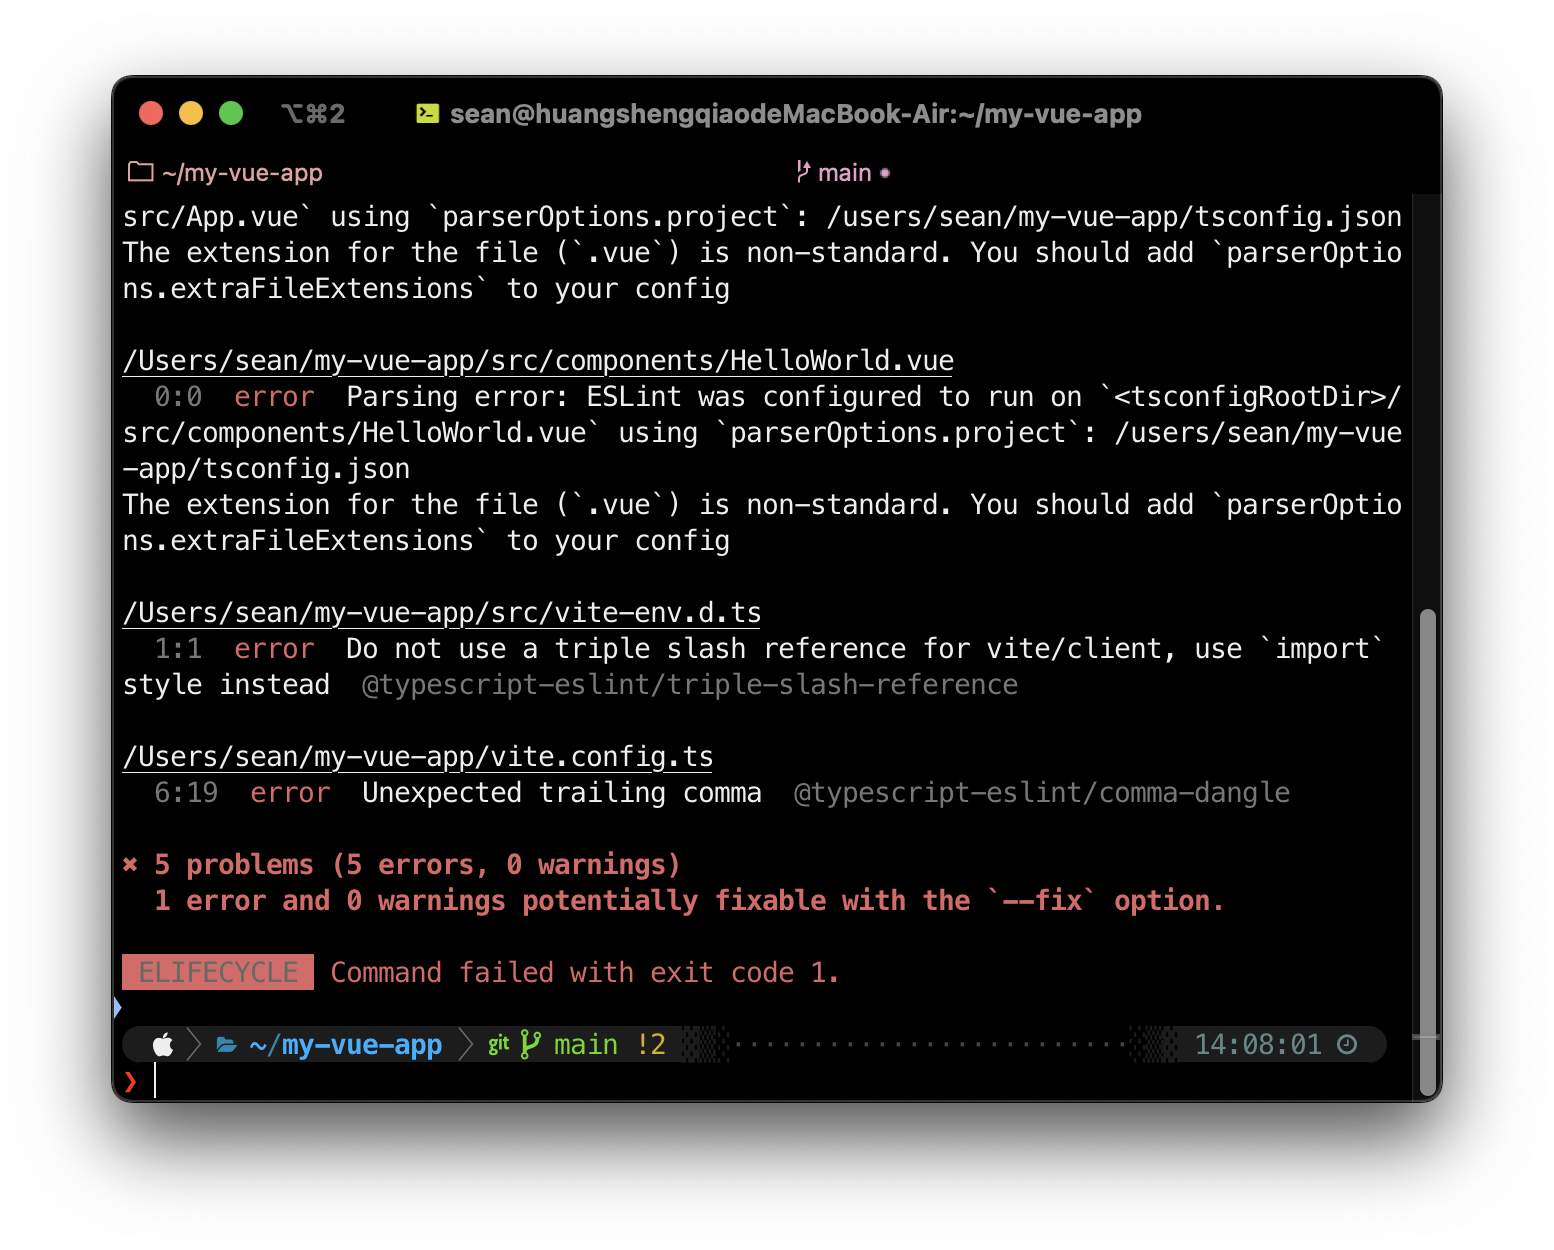
😵 處理 .vue 檔的 non-standard 問題
打開任意 .vue 檔會發現它們也出現了錯誤訊息:

Parsing error: ESLint was configured to run on
<tsconfigRootDir>/src/App.vueusingparserOptions.project: /users/sean/my-vue-app/tsconfig.json
The extension for the file (.vue) is non-standard. You should addparserOptions.extraFileExtensionsto your config.
根據錯誤訊息的提示在 .eslintrc.cjs 加入 parserOptions.extraFileExtensions 後,再次重新載入 VSCode 視窗即可。
// .eslintrc.cjs
{
    // ...
    "parserOptions": {
        "ecmaVersion": "latest",
        "sourceType": "module",
        project: ['./tsconfig.json', './tsconfig.node.json'],
        parser: '@typescript-eslint/parser',
+       extraFileExtensions: ['.vue']
    },
}
// .eslintrc.cjs
{
    // ...
    "parserOptions": {
        "ecmaVersion": "latest",
        "sourceType": "module",
        project: ['./tsconfig.json', './tsconfig.node.json'],
        parser: '@typescript-eslint/parser',
+       extraFileExtensions: ['.vue']
    },
}
😵 跳過檢查某些檔案
dist/
我們沒必要檢查建構好的已醜化和壓縮的檔案,因此可以在 .eslintrc.cjs 的 ignorePatterns 排除掉整個 dist 目錄:
// .eslintrc.cjs
module.exports = {
    // ...
+   ignorePatterns: ['dist'],
}
// .eslintrc.cjs
module.exports = {
    // ...
+   ignorePatterns: ['dist'],
}
vite-env.d.ts
按照預設規則,vite-env.d.ts 會違反 @typescript-eslint/triple-slash-reference 這條規則,建議可以在 vite-env.d.ts 的開頭加上註解 // eslint-disable-next-line ... 來跳過檢查:
// eslint-disable-next-line @typescript-eslint/triple-slash-reference
/// <reference types="vite/client" />
// eslint-disable-next-line @typescript-eslint/triple-slash-reference
/// <reference types="vite/client" />
✅ 大功告成
到此為止 ESLint 應該就可以順利的運作,接著你可以更進一步根據個人或團隊的風格和偏好調整 rules,開啟、關閉或調整某些規則。
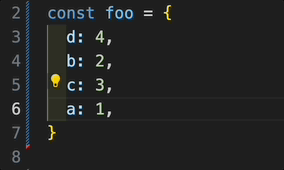
例如我總是習慣微調 @typescript-eslint/comma-dangle(行末逗號)的設定,讓最後一項依然保留逗號,這樣就可以更方便調整物件成員的順序:
module.exports = {
  // ...
  rules: {
    // ...
    '@typescript-eslint/comma-dangle': ['error', {
      arrays: 'always-multiline',
      objects: 'always-multiline',
      imports: 'always-multiline',
      exports: 'always-multiline',
      functions: 'only-multiline',
    }],
  },
}
module.exports = {
  // ...
  rules: {
    // ...
    '@typescript-eslint/comma-dangle': ['error', {
      arrays: 'always-multiline',
      objects: 'always-multiline',
      imports: 'always-multiline',
      exports: 'always-multiline',
      functions: 'only-multiline',
    }],
  },
}
✨ 設定 VSCode 存檔時自動排版
你還可以讓開發體驗變的更舒適。
打開 .vscode/settings.json,若原本沒有這個檔案可以手動建立一個,加入以下設定:
{
  // ...
  "editor.codeActionsOnSave": {
    "source.fixAll.eslint": true
  },
}
{
  // ...
  "editor.codeActionsOnSave": {
    "source.fixAll.eslint": true
  },
}
回到剛才滿江紅的 .eslintrc.cjs 測試看看,在手動存檔(⌘ + S)後就會自動排版和修正錯誤:

✨ 透過 script 檢查錯誤或是自動修復錯誤
儘管在 VSCode 中的檢查和錯誤提示有助於得到即時反饋,但這些提示終究是 「消極的」 。如果開發者使用別款 IDE,或只是單純對提示視若無睹,他們仍然可以輕易地違反這些規則,並提交不符合規則的程式碼。
因此我們還需要透過 script 的方式來真正的執行規則檢查。
用指令檢查錯誤
打開 package.json,在 scripts 中加入指令 lint,其中 --ext 的後面是想要檢查的副檔名:
// package.json
{
  // ...
  "scripts": {
    "dev": "vite",
    "build": "vue-tsc && vite build",
    "preview": "vite preview",
+   "lint": "npx eslint . --ext .ts,.js,.cjs,.vue"
  },
}
// package.json
{
  // ...
  "scripts": {
    "dev": "vite",
    "build": "vue-tsc && vite build",
    "preview": "vite preview",
+   "lint": "npx eslint . --ext .ts,.js,.cjs,.vue"
  },
}
接著在 terminal 測試執行效果
pnpm run lint
pnpm run lint
可以看到它列出了所有不符合設定規則的 error 和 warning,並且回傳 exit code 1。
這表示你就可以將這條指令整合進你的部署流程中,例如:
- 搭配 husky:使用 husky 可以在每次 commit 前自動執行
pnpm run lint。如果程式碼不符合規則就不給 commit,迫使開發者修復錯誤後再進行 commit,確保 code base 的風格始終維持一致 - CI/CD:你可以將
pnpm run lint加入 CI/CD 流程,這樣在每次部署前都會自動進行代碼檢查。若檢查失敗,部署流程就會自動中斷,讓開發者不得不修正錯誤
用指令自動修復錯誤
打開 package.json,在 scripts 中加入以下指令 lint:fix:
// package.json
{
  // ...
  "scripts": {
    "dev": "vite",
    "build": "vue-tsc && vite build",
    "preview": "vite preview",
    "lint": "npx eslint . --ext .ts,.js,.cjs,.vue",
+   "lint:fix": "npx eslint --fix . --ext .ts,.js,.cjs,.vue"
  },
}
// package.json
{
  // ...
  "scripts": {
    "dev": "vite",
    "build": "vue-tsc && vite build",
    "preview": "vite preview",
    "lint": "npx eslint . --ext .ts,.js,.cjs,.vue",
+   "lint:fix": "npx eslint --fix . --ext .ts,.js,.cjs,.vue"
  },
}
接著在 terminal 測試執行效果
pnpm run lint:fix
pnpm run lint:fix
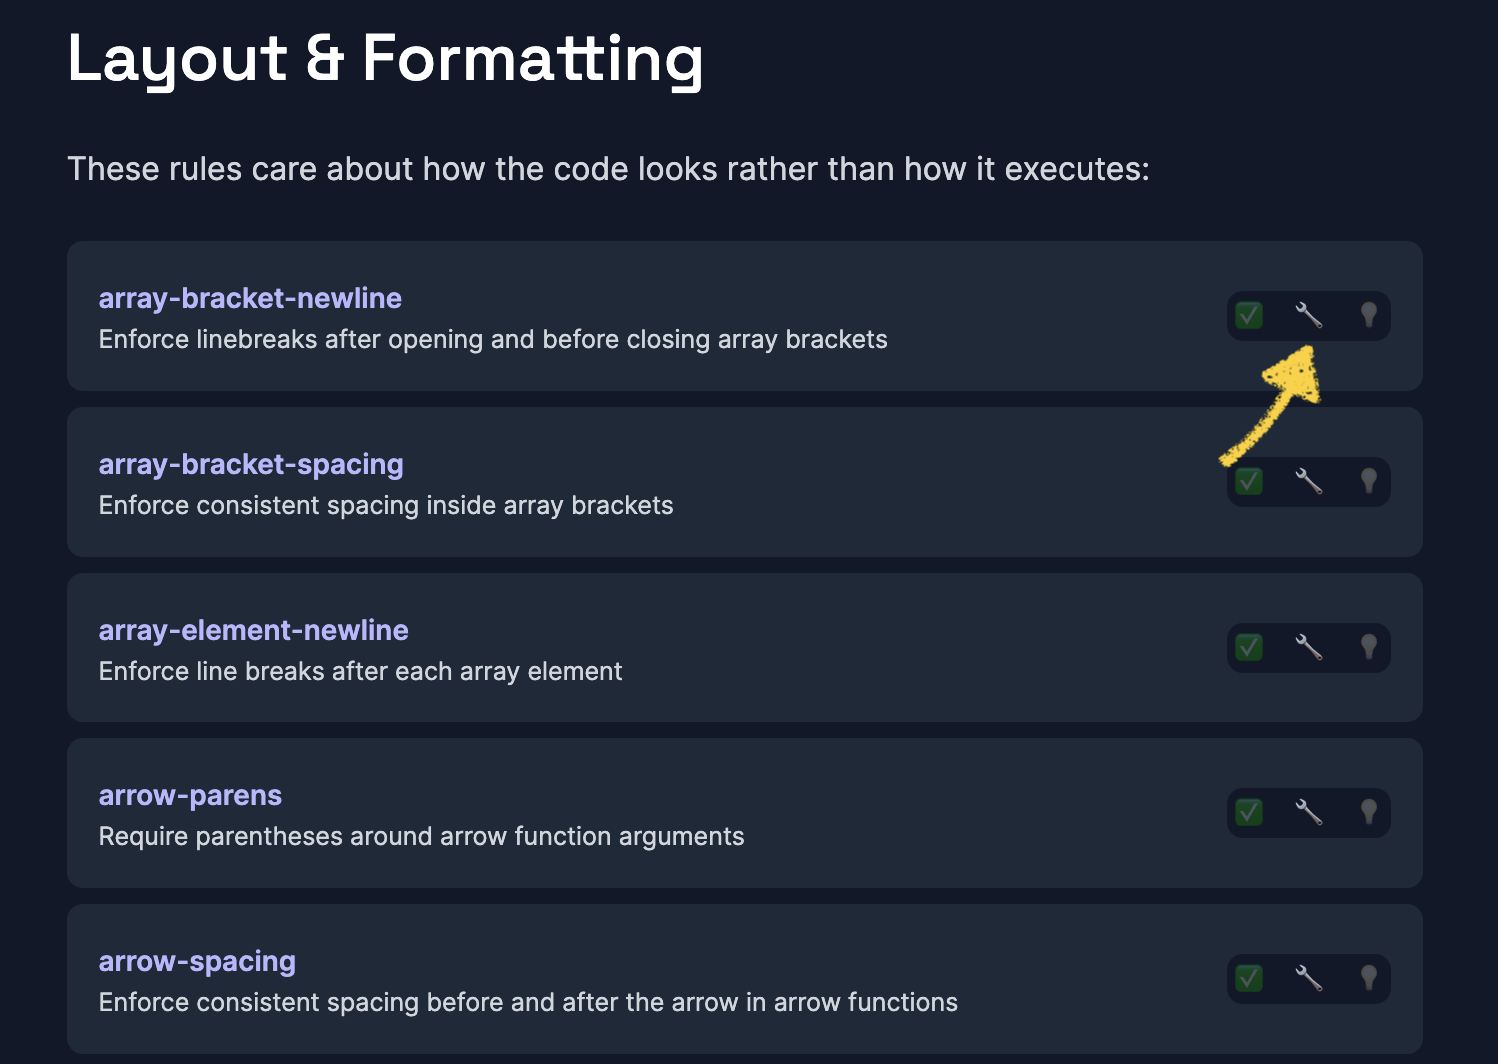
順利的話「可自動修正(automatically fixable)」的那些規則都會被自動修正,也就是在 Rule 列表有 🔧 符號的那些項目。
ESLint 即將棄用「排版」規則
ESLint 在 2023 年 10 月宣布將棄用排版(Formatting)規則,也就是棄用那些跟空格、縮排、換行、單/雙引號、分號等相關規則。而其餘分類下的規則不受影響,例如強制使用嚴格等於 ===(eqeqeq)、強制命名小駝峰(camelcase)等。
未來若想繼續透過 ESLint 而非 Prettier 來排版程式碼,可以考慮搭配 ESLint Stylistic 來達成一樣的效果。這個 plugin 將會繼續接棒,維護這些被棄用的規則。
參考資料
https://github.com/vitejs/vite/issues/13739#issuecomment-1641380518
https://juejin.cn/post/7126043888573218823